14. 10. 2015.
19. 6. 2015.
SUMMER VACATION IS FINALLY HERE!!! (sorry if it isn't in your country). So......... Here's a amazing summer recipe that you have to try.
I am so excited for popsicle season, you guys! It’s pop season pretty much year round here in Alabama, maybe slightly less in the winter, but still. I got a new popsicle mold recently, and this weekend was the perfect time to break it in because it was in the 90s all. weekend. long. Last Saturday, my friend Emma held a photography workshop, and since she’s also a food blogger, the subject we practiced with was obviously food. She made all these delicious and gorgeous dishes, as well as some extremely refreshing basil lemonade. While I was sipping on it, I realized it would make a fabulous popsicle.
I decided to throw in some strawberries because I just really love strawberry lemonade. And honestly, I didn’t want to buy like 10 lemons in order to get enough juice to make 10 lemonade pops. Strawberries, a few lemons, some basil, and sugar are all you need to make these refreshing treats. To make these pops, I started out with a basil simple syrup. Then I juiced the lemons and pureed two cups of chopped strawberries. After the basil simple syrup cooled down, I stirred all the ingredients together, and poured it into the mold. These pops were ready after about 4 hours of freezing.
And there you have it. Easy and refreshing summer treats. Can we all just go relax by a pool somewhere with these popsicles? Okay great.

Strawberry Basil Lemonade Popsicles
I am so excited for popsicle season, you guys! It’s pop season pretty much year round here in Alabama, maybe slightly less in the winter, but still. I got a new popsicle mold recently, and this weekend was the perfect time to break it in because it was in the 90s all. weekend. long. Last Saturday, my friend Emma held a photography workshop, and since she’s also a food blogger, the subject we practiced with was obviously food. She made all these delicious and gorgeous dishes, as well as some extremely refreshing basil lemonade. While I was sipping on it, I realized it would make a fabulous popsicle.
I decided to throw in some strawberries because I just really love strawberry lemonade. And honestly, I didn’t want to buy like 10 lemons in order to get enough juice to make 10 lemonade pops. Strawberries, a few lemons, some basil, and sugar are all you need to make these refreshing treats. To make these pops, I started out with a basil simple syrup. Then I juiced the lemons and pureed two cups of chopped strawberries. After the basil simple syrup cooled down, I stirred all the ingredients together, and poured it into the mold. These pops were ready after about 4 hours of freezing.
And there you have it. Easy and refreshing summer treats. Can we all just go relax by a pool somewhere with these popsicles? Okay great.
Serves: 8-10 popsicles, depending on the mold
Ingredients
- 2 cups water, divided
- 1 cup sugar
- 7 basil leaves
- 2 cups chopped fresh strawberries
- 4 lemons, juiced
Instructions
- In a saucepan over medium heat, combine one cup of water, the sugar, and basil leaves. Bring mixture to a simmer, stirring until sugar dissolves. Let the mixture cook for about 10 minutes, stirring often. Remove basil leaves and set aside to cool.
- Process the strawberries in a food processor or blender. (Strain strawberry puree through a sieve to remove the seeds, if you'd like.) Combine strawberry puree with lemon juice, basil simple syrup, and remaining cup of water.
- Pour the mixture into a 10-count popsicle mold. Freeze for at least 4 hours, or overnight. Enjoy!

Cadbury Peeps S’mors Bars
a couple of things to note:
- Bunny Peeps work the best because they make a flat surface for the second layer of crust that goes on the top.
- If you use the big Cadbury Eggs, cut them in half longways, otherwise they will be too tall for the pan. I didn’t have as many eggs as I thought I did, so I used some of my solid chocolate bunny to fill in the spaces.
- The easiest way to fit the crust into the pan is to roll it out in pieces and kind of fit them together like a puzzle. You can really see this in the photo of the top layer.
- You don’t have to use Cadburry Eggs for these bars. They’re the best, but any choclate-type candy will do!
Cadbury Peeps S'mors Bars
Ingredients
oatmeal graham cracker crust
- ½ cup butter, softened
- ¼ cup light brown sugar
- ¼ cup granulated sugar
- 1 tsp vanilla extract
- 1 large egg
- 1 cup all purpose flour
- ¾ cup graham cracker crumbs
- ⅓ cup rolled oats
fillings
- Cadbury creme eggs or Cadbury caramel eggs
- bunny Peeps!
Instructions
oatmeal graham cracker crust
- Preheat the oven to 350 degrees and spray a 9x9in square pan with nonstick spray.
- In a large bowl, beat butter on medium speed with an electric mixer until creamy. Next, add both sugars and vanilla extract, and mix until combined and fluffy. Add the egg and mix well.
- Then add the flour, graham cracker crumbs, and oats. Mix on low speed at first, and then on medium speed once the ingredients start sticking together.
- Roll out half of the dough on a well floured surface and place it in the prepared pan. (For me, it was easiest to roll out pieces and fit them in the bottom as opposed to trying to roll out a perfect square.) Then add your preferred candy! I cut my Cadbury eggs in half, otherwise they would have been too tall for the pan. After that, add the Peeps. Bunnies work best here and make a nice, flat surface for the top layer of crust. Add the crust in the same way as the bottom layer--in large pieces until completely covered.
- Bake for 20 minutes and let the bars cool until slightly warm. If they are too warm and you try to cut them into squares or lift them from the pan, it will be a giant melty, sticky mess. After cooling, spray a knife with a thin layer of nonstick spray and cut the bars into squares. You may need to wipe off the knife and reapply the nonstick coating a couple of times.
- Enjoy!
Recipe from bethcakes. All
images and content are copyright protected. Please do not use my images
without permission. If you would like to republish this recipe, please
re-write the recipe in your own words, or link back to this post for the
recipe. Thank you.
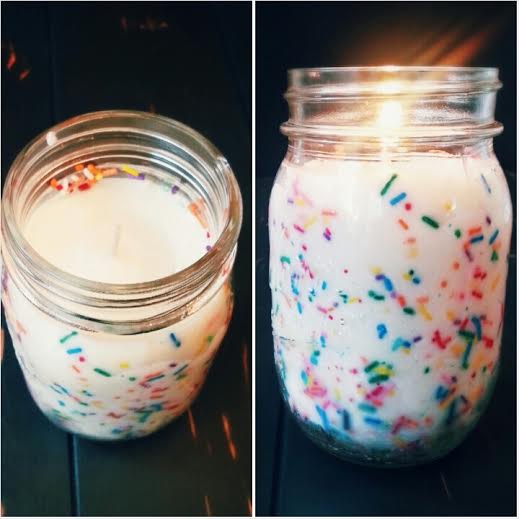
What you need:
2 pint-sized (16oz) mason jars
Pre-waxed wicks (I got a pack of 6, with the attachment already on the ends)
Hot glue gun
Pencils, pens, or something similar to hold the wicks in place
Tape
2-3 tbsp water
1-2 tbsp corn syrup
A small paintbrush or cloth
1/2 cup rainbow jimmies (or similar colorful sprinkles)
1 lb soy wax flakes (or old candles if using smaller jars)
Cupcake scented wax cubes (Also found at Michael’s)
Measuring cup with spout
So you’ve got your jars and wicks.
And you’re going to hot glue the wick attachments to the bottom of the jars.
Then in a bowl, mix corn syrup and water. Start with just one of the jars, and coat the inside with the corn syrup mixture. First I tried using a folded paper towel, but couldn’t really reach the bottom. You don’t need to coat the actual bottom of the jar, but a small paintbrush helped get the lower part. Holding the jar horizontally, add a spoonful of sprinkles and slowly roll the jar so they’ll slide around and stick to the inside. Add another spoonful and repeat until the inside is completely covered. The paint brush will come in handy if there are any spot where the sprinkles don’t stick.
Repeat with the second jar.


Lay a pen or pencil across the tops of the jars and tape the wicks to them to keep the wicks centered.

Using
a double boiler, or a make-shift one with a pot and heat-proof bowl
(which is what I did – fill a pot half-full with water, bring to a
simmer, and set metal bowl on top), melt the wax flakes and 3 or 4 of
the scent cubes. I only used three and am planning on using the other 3
when I make these candles again. But you can use more or all of them for
a stronger scent if you want.


You
can attempt to pour the melted wax out of the bowl and into the jars,
but I knew that would be a disaster for me. So I poured two cups of
melted wax into a measuring cup with a spout. Leave the rest of the
melted wax in the bowl over simmering water.
Pour the wax slowly into a jar. Try to pour it directly into the center and away from the sides.
Repeat with the rest of the wax and the other jar.

Some
of the sprinkles will fall off and sink to the bottom, but that’s okay.
(Just stop burning the candle when it gets to that point.) I put my
mason jars immediately in the freezer so they’d firm up faster and
prevent too many of the sprinkles from falling off. Freeze for 3-4
hours.

Once wax has set and is completely solid, you’re good to go!
2 pint-sized (16oz) mason jars
Pre-waxed wicks (I got a pack of 6, with the attachment already on the ends)
Hot glue gun
Pencils, pens, or something similar to hold the wicks in place
Tape
2-3 tbsp water
1-2 tbsp corn syrup
A small paintbrush or cloth
1/2 cup rainbow jimmies (or similar colorful sprinkles)
1 lb soy wax flakes (or old candles if using smaller jars)
Cupcake scented wax cubes (Also found at Michael’s)
Measuring cup with spout
So you’ve got your jars and wicks.
And you’re going to hot glue the wick attachments to the bottom of the jars.
Then in a bowl, mix corn syrup and water. Start with just one of the jars, and coat the inside with the corn syrup mixture. First I tried using a folded paper towel, but couldn’t really reach the bottom. You don’t need to coat the actual bottom of the jar, but a small paintbrush helped get the lower part. Holding the jar horizontally, add a spoonful of sprinkles and slowly roll the jar so they’ll slide around and stick to the inside. Add another spoonful and repeat until the inside is completely covered. The paint brush will come in handy if there are any spot where the sprinkles don’t stick.
Repeat with the second jar.


Repeat with the rest of the wax and the other jar.

Hope you guys liked it we decided to put a little DIY on our blog. Easy and quik
10. 2. 2015.
2. 1. 2015.
Пријавите се на:
Постови (Atom)


.jpg)
.jpg)